どうも。どっことです。今回はRelativeLayoutについて解説します。
RelativeLayout
RelativeLayoutはViewを相対的な位置関係で配置するためのViewGroupです。親のViewGroupを基準とした位置や同じRelativeLayout内の他Viewを基準として位置を決めることができ、FrameLayoutやLinearLayoutより柔軟にViewを配置することができます。現在はConstraintLayoutが制約という形でRelativeLayoutよりも難しい配置設定を実現できるようになったことから、RelativeLayoutはレガシーなViewGroupという整理になっていますが、長く開発されてきたアプリの場合RelativeLayoutを使って画面レイアウトを実装しているものも多いと思いますので、理解しておくに越したことはないでしょう。今回はそんなRelativeLayoutの使い方を解説します。
押さえておくポイント
RelativeLayoutを使ううえで、押さえておくべきポイントは以下です。
layout_alignParent***layout_center***layout_toStartOflayout_toEndOflayout_abovelayout_belowlayout_align***
順番に解説していきます。
layout_alignParent**
まずはlayout_alignParent**です。layout_alignParent**
はViewを上下左右のいずれかに寄せる設定です。以下の4種類があります。
layout_alignParentTop:- Viewを上寄せに配置する(デフォルトなので使うことが少ない)
layout_alignParentBottom:- Viewを下寄せに配置する
layout_alignParentStart(Left):- Viewを左寄せに配置する(デフォルトなので使うことが少ない)
layout_alignParentEnd(Right):- Viewを右寄せに配置する
以下はサンプルです。layout_alignParentTopとlayout_alignParentStartは設定してもViewが移動しないので、省略します。
<?xml version="1.0" encoding="utf-8"?>
<RelativeLayout xmlns:android="http://schemas.android.com/apk/res/android"
    android:layout_width="match_parent"
    android:layout_height="match_parent">

    <TextView
        android:layout_width="wrap_content"
        android:layout_height="wrap_content"
        android:layout_alignParentEnd="true"
        android:text="alignParentEnd" />

    <TextView
        android:layout_width="wrap_content"
        android:layout_height="wrap_content"
        android:layout_alignParentBottom="true"
        android:text="alignParentBottom" />

</RelativeLayout>
こちらを実装した時のプレビューは以下です。

layout_center**
layout_center**は上下中央、左右中央、中央にViewを配置するための設定です。以下の3種類があります。
layout_centerVertical- Viewを上下中央に配置する
layout_centerHorizontal- Viewを左右中央に配置する
layout_centerInParent- Viewを中央に配置する
以下はサンプルです。
<?xml version="1.0" encoding="utf-8"?>
<RelativeLayout xmlns:android="http://schemas.android.com/apk/res/android"
    android:layout_width="match_parent"
    android:layout_height="match_parent">

    <TextView
        android:layout_width="wrap_content"
        android:layout_height="wrap_content"
        android:layout_centerInParent="true"
        android:text="Center\nIn\nParent" />

    <TextView
        android:layout_width="wrap_content"
        android:layout_height="wrap_content"
        android:layout_centerHorizontal="true"
        android:text="Center\nHorizontal" />

    <TextView
        android:layout_width="wrap_content"
        android:layout_height="wrap_content"
        android:layout_centerVertical="true"
        android:text="Center\nVertical" />

</RelativeLayout>
こちらを実装した時のプレビューが以下です。

layout_toStartOf
ここまでの配置設定は親Viewを基準にして設定するものでしたが、ここからは同じRelativeLayout内にある他のViewに対する設定となります。
まずはlayout_toStartOfです。
<?xml version="1.0" encoding="utf-8"?>
<RelativeLayout xmlns:android="http://schemas.android.com/apk/res/android"
    android:layout_width="match_parent"
    android:layout_height="match_parent">

    <TextView
        android:id="@+id/text_view_target"
        android:layout_width="wrap_content"
        android:layout_height="wrap_content"
        android:layout_alignParentBottom="true"
        android:layout_alignParentEnd="true"
        android:text="target" />

    <TextView
        android:layout_width="wrap_content"
        android:layout_height="wrap_content"
        android:padding="8dp"
        android:layout_toStartOf="@id/text_view_target"
        android:text="toStartOf" />

</RelativeLayout>
layout_toStartOfを設定すると、指定したViewの左と自身の右の位置を揃えてくれます。

layout_toEndOf
次にlayout_toEndOfです。
<?xml version="1.0" encoding="utf-8"?>
<RelativeLayout xmlns:android="http://schemas.android.com/apk/res/android"
    android:layout_width="match_parent"
    android:layout_height="match_parent">

    <TextView
        android:id="@+id/text_view_target"
        android:layout_width="wrap_content"
        android:layout_height="wrap_content"
        android:layout_alignParentEnd="true"
        android:layout_centerVertical="true"
        android:text="target" />

    <TextView
        android:layout_width="wrap_content"
        android:layout_height="wrap_content"
        android:layout_above="@id/text_view_target"
        android:padding="8dp"
        android:text="toStartOf" />

</RelativeLayout>
layout_toEndOfを設定すると、指定したViewの右と、自身の左の位置を揃えてくれます。

layout_above
次にlayout_aboveです。
<?xml version="1.0" encoding="utf-8"?>
<RelativeLayout xmlns:android="http://schemas.android.com/apk/res/android"
    android:layout_width="match_parent"
    android:layout_height="match_parent">

    <TextView
        android:id="@+id/text_view_target"
        android:layout_width="wrap_content"
        android:layout_height="wrap_content"
        android:layout_alignParentEnd="true"
        android:layout_centerVertical="true"
        android:text="target" />

    <TextView
        android:layout_width="wrap_content"
        android:layout_height="wrap_content"
        android:layout_above="@id/text_view_target"
        android:padding="8dp"
        android:text="above" />

</RelativeLayout>
layout_aboveを設定すると、指定したViewの下と自身の上の位置を揃えてくれます。

layout_below
そしてlayout_belowです。
<?xml version="1.0" encoding="utf-8"?>
<RelativeLayout xmlns:android="http://schemas.android.com/apk/res/android"
    android:layout_width="match_parent"
    android:layout_height="match_parent">

    <TextView
        android:id="@+id/text_view_target"
        android:layout_width="wrap_content"
        android:layout_height="wrap_content"
        android:layout_alignParentEnd="true"
        android:layout_centerVertical="true"
        android:text="target" />

    <TextView
        android:layout_width="wrap_content"
        android:layout_height="wrap_content"
        android:layout_below="@id/text_view_target"
        android:padding="8dp"
        android:text="below" />

</RelativeLayout>
layout_belowを設定すると、指定したViewの上と自身の下の位置を揃えてくれます。

layout_align**
最後に紹介するのは、layout_align**です。この設定は指定のViewの端を揃えるものです。以下の4種類があります。
layout_alignTop:- 指定Viewの上端を揃える
layout_alignBottom:- 指定Viewの下端を揃える
layout_alignStart(Left):- 指定Viewの左端を揃える
layout_alignEnd(Right):- 指定Viewの右端を揃える
layout_alignTop
layout_alignTopです。指定したViewの上端と揃う位置に配置されます。
<?xml version="1.0" encoding="utf-8"?>
<RelativeLayout xmlns:android="http://schemas.android.com/apk/res/android"
    android:layout_width="match_parent"
    android:layout_height="match_parent">

    <TextView
        android:id="@+id/text_view_target"
        android:layout_width="wrap_content"
        android:layout_height="wrap_content"
        android:layout_centerInParent="true"
        android:text="target" />

    <TextView
        android:layout_width="wrap_content"
        android:layout_height="wrap_content"
        android:layout_alignTop="@id/text_view_target"
        android:padding="4dp"
        android:text="alignTop" />

</RelativeLayout>
指定したtargetと上端が揃う位置にViewが配置されます。

layout_alignBottom
次にlayout_alignBottomです。指定したViewの下端と揃う位置に配置されます。
<?xml version="1.0" encoding="utf-8"?>
<RelativeLayout xmlns:android="http://schemas.android.com/apk/res/android"
    android:layout_width="match_parent"
    android:layout_height="match_parent">

    <TextView
        android:id="@+id/text_view_target"
        android:layout_width="wrap_content"
        android:layout_height="wrap_content"
        android:layout_centerInParent="true"
        android:text="target" />

    <TextView
        android:layout_width="wrap_content"
        android:layout_height="wrap_content"
        android:layout_alignBottom="@id/text_view_target"
        android:padding="4dp"
        android:textSize="8dp"
        android:text="alignBottom" />

</RelativeLayout>
指定したtargetと下端が揃う位置にViewが配置されます。(テキストサイズを小さくしています)

layout_alignStart
続いてlayout_alignStartです。指定したViewの左端と揃う位置に配置されます。
<?xml version="1.0" encoding="utf-8"?>
<RelativeLayout xmlns:android="http://schemas.android.com/apk/res/android"
    android:layout_width="match_parent"
    android:layout_height="match_parent">

    <TextView
        android:id="@+id/text_view_target"
        android:layout_width="wrap_content"
        android:layout_height="wrap_content"
        android:layout_centerInParent="true"
        android:text="target" />

    <TextView
        android:layout_width="wrap_content"
        android:layout_height="wrap_content"
        android:layout_alignStart="@id/text_view_target"
        android:padding="4dp"
        android:text="alignStart" />

</RelativeLayout>

layout_alignEnd
最後にlayout_alignEndです。指定したViewの右端と揃う位置に配置されます。
<?xml version="1.0" encoding="utf-8"?>
<RelativeLayout xmlns:android="http://schemas.android.com/apk/res/android"
    android:layout_width="match_parent"
    android:layout_height="match_parent">

    <TextView
        android:id="@+id/text_view_target"
        android:layout_width="wrap_content"
        android:layout_height="wrap_content"
        android:layout_centerInParent="true"
        android:text="target" />

    <TextView
        android:layout_width="wrap_content"
        android:layout_height="wrap_content"
        android:layout_alignEnd="@id/text_view_target"
        android:padding="4dp"
        android:text="alignEnd" />

</RelativeLayout>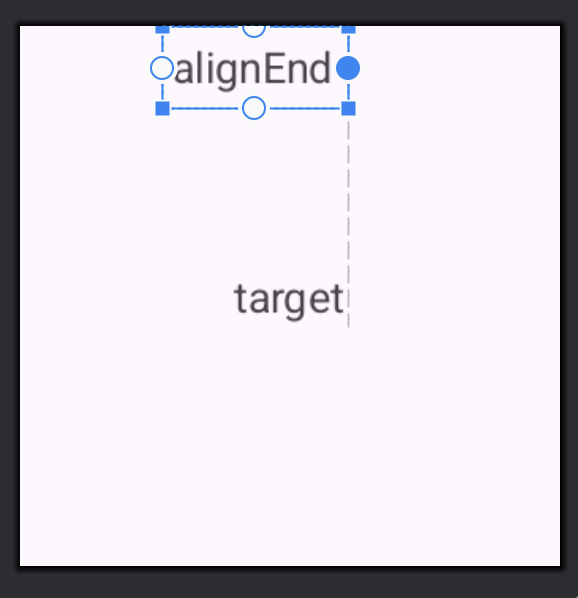
まとめ
今回はRelativeLayoutについて解説しました。すでにレガシーとなったViewGroupですが、まだまだ利用されているプロジェクトも多いと思うので、それぞれの設定について理解しておきたいですね。