どうも。どっことです。今回はLinearLayoutについて解説します。
LinearLayout
LinearLayoutは順番にViewを並べてくれるというかなり便利なViewGroupであり、それでいて利用するために必要な設定が多くないところから今でも利用頻度が高いものとなっています。
今回はそんなLinearLayoutの使い方を解説します。
押さえておくポイント
LinearLayoutを使う上で押さえておくべきポイントは以下です。
orientationlayout_weightlayout_gravity/gravity
順番に解説していきます。
orientation
orientationは、Viewをどの方向に並べるか設定するものです。Viewを順番に並べる機能を持つLinearLayoutの最も重要な設定となります。
設定は縦方向(vertical)か横方向(horizontal)のいずれかで、縦方向を設定した場合は上から下に、横方向を設定した場合は左から右にViewが配置されます。
もし画面に収まらない場合は当然はみ出してしまいますが、LinearLayoutにはスクロールする機能がないので、ScrollViewやHorizontalScrollViewの中にLinearLayoutを配置することで画面をスクロール可能にしましょう。
layout_weight
layout_weightはLinearLayout内に並べたViewの大きさを比率で決定するためのものです。
例えばいくつかのViewを同じ大きさで並べたい場合は、すべてのViewのlayout_weightを1に設定することで全てのViewの大きさを1:1にすることができます。Viewの大きさを決めるlayout_widthまたはlayout_heightを0dpに設定する必要があります。
例えば3つのViewを均等幅(1:1:1)で並べる場合は以下です。
<?xml version="1.0" encoding="utf-8"?>
<LinearLayout xmlns:android="http://schemas.android.com/apk/res/android"
    android:layout_width="match_parent"
    android:layout_height="wrap_content"
    android:orientation="horizontal">

    <TextView
        android:layout_width="0dp"
        android:layout_height="wrap_content"
        android:layout_weight="1"
        android:text="左"
        android:background="@android:color/holo_red_dark"
        android:gravity="center" />

    <TextView
        android:layout_width="0dp"
        android:layout_height="wrap_content"
        android:layout_weight="1"
        android:text="中"
        android:gravity="center" />

    <TextView
        android:layout_width="0dp"
        android:layout_height="wrap_content"
        android:layout_weight="1"
        android:text="右"
        android:background="@android:color/holo_blue_dark"
        android:gravity="center" />
</LinearLayout>
このレイアウトのプレビューが以下です。

またlayout_weightの便利な使い方として、並べたViewのうちの1つだけ画面いっぱいに表示したいケースが挙げられます。
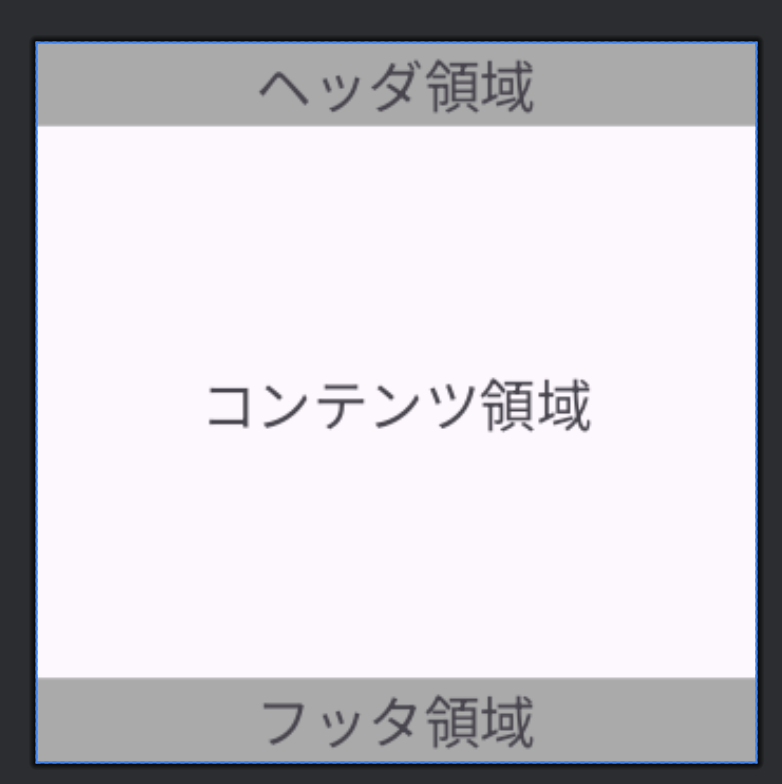
例えば画面内にヘッダ・フッタを持つページの場合です。ヘッダとフッタは固定(または可変長)、コンテンツ領域は残った領域全てとしてViewを配置するケースがほとんどだと思いますが、このようなケースでlayout_weightが大活躍します。
<?xml version="1.0" encoding="utf-8"?>
<LinearLayout xmlns:android="http://schemas.android.com/apk/res/android"
    android:layout_width="match_parent"
    android:layout_height="match_parent"
    android:orientation="vertical">

    <TextView
        android:layout_width="match_parent"
        android:layout_height="wrap_content"
        android:background="@android:color/darker_gray"
        android:gravity="center"
        android:text="ヘッダ領域" />

    <TextView
        android:layout_width="match_parent"
        android:layout_height="0dp"
        android:layout_weight="1"
        android:gravity="center"
        android:text="コンテンツ領域" />


    <TextView
        android:layout_width="match_parent"
        android:layout_height="wrap_content"
        android:background="@android:color/darker_gray"
        android:gravity="center"
        android:text="フッタ領域" />
</LinearLayout>
この実装をプレビュー表示すると以下になります。
RelativeLayoutやConstraintLayoutでも同様の画面構成を実現できますが、これらを使う場合はヘッダ・フッタ領域にidを付与する必要があり、それを基準にコンテンツ領域に対して制約をつける必要があります。
layout_gravity/gravity
layout_gravityはViewの位置を決める設定です。LinearLayout内のViewに対して設定します。
この設定はFrameLayoutにも同様にありますが、LinearLayoutではorientationの設定が反映されつつ、layout_gravityの設定が反映されます。
例えば、以下のケースを見てみましょう。
<?xml version="1.0" encoding="utf-8"?>
<LinearLayout xmlns:android="http://schemas.android.com/apk/res/android"
    android:layout_width="match_parent"
    android:layout_height="match_parent"
    android:orientation="vertical">

    <TextView
        android:layout_width="wrap_content"
        android:layout_height="wrap_content"
        android:background="@android:color/holo_red_dark"
        android:layout_gravity="end"
        android:text="左" />

    <TextView
        android:layout_width="wrap_content"
        android:layout_height="wrap_content"
        android:layout_gravity="center_horizontal"
        android:text="中" />

    <TextView
        android:layout_width="wrap_content"
        android:layout_height="wrap_content"
        android:background="@android:color/holo_blue_dark"
        android:text="右" />
</LinearLayout>このレイアウトのプレビューは以下になります。LinearLayoutのorientationの制約が守られつつ、layout_gravityに合わせた位置にViewが配置されています。

また、LinearLayoutに対してgravityを設定することもできます。gravityはView内の要素に対して位置を指定するもので、テキストの改行位置などを決めるためにTextViewでも指定できます。
↑の例にgravityを適用させるとどうなるか見てみましょう。LinearLayoutにgravity:centerを設定します。
<?xml version="1.0" encoding="utf-8"?>
<LinearLayout xmlns:android="http://schemas.android.com/apk/res/android"
    android:layout_width="match_parent"
    android:layout_height="match_parent"
    android:gravity="center"
    android:orientation="vertical">
    <!-- 内部は同じなので省略 -->
</LinearLayout>
これのプレビューは以下になります。

全てのViewが中央寄せになりましたが、個別にlayout_gravityを設定している左は右寄せのまま、逆にもともと左寄せになっていた右はLinearLayoutのgravityの設定により中央寄せに移動しました。
何も設定していなかった右が中央寄せに移動するのは良いとして、左が右寄せのままになっているのは、layout_gravityが親のViewGroup(LinearLayout)のgravityの設定を上書きしているから、と考えられますね。
まとめ
今回はLinearLayoutについて解説しました。非常に高頻度に使われるとても使いやすいViewGroupなので、ぜひ使いこなせるようにしておきましょう。