どうも。どっことです。今回はGridLayoutの使い方について解説します。
GridLayout
Androidのレイアウトを実装するとき、LinearLayoutやConstraintLayoutをよく利用しますが、Viewを格子状に配置する時はGridLayoutが便利です。
LinearLayoutを複数用意しなくても済みますし、ConstraintLayoutで必要なたくさんの属性値を設定しなくても済みます。また、一部のLayoutParam属性に初期値が設定されているので、実際に実装する時の設定項目が少なく済むのも良いところの一つかと思います。今回はそんなGridLayoutの使い方について解説します。
GridLayoutの使い方
今回は、レイアウトファイルでGridLayoutを利用する場合の実装を解説します。
<?xml version="1.0" encoding="utf-8"?>
<GridLayout xmlns:android="http://schemas.android.com/apk/res/android"
    android:layout_width="match_parent"
    android:layout_height="wrap_content"
    android:columnCount="3"
    android:background="@android:color/holo_red_light"
    android:rowCount="1">

    <TextView
        android:layout_row="0"
        android:layout_column="0"
        android:padding="10dp"
        android:background="@android:color/holo_blue_bright"
        android:text="00" />
    <TextView
        android:layout_row="0"
        android:layout_column="1"
        android:padding="10dp"
        android:background="@android:color/holo_blue_dark"
        android:text="01" />
    <TextView
        android:layout_row="0"
        android:layout_column="2"
        android:padding="10dp"
        android:background="@android:color/holo_green_light"
        android:text="02" />
</GridLayout>GridLayout-
layout_width:
match_content指定。画面幅いっぱい指定。 -
layout_height:
wrap_content指定。必要最小限の高さ指定。 - layout_row:1、layout_column:3をそれぞれ指定。1行3列の格子指定。
- GridLayout内の子View
- layout_width/layout_heightを指定していない。
-
これは
GridLayoutが初期値としてwrap_contentを設定しているため。 -
layout_column/layout_rowにはそれぞれの配置位置を指定。
この実装でそのままレイアウトを確認すると、以下が表示されます。
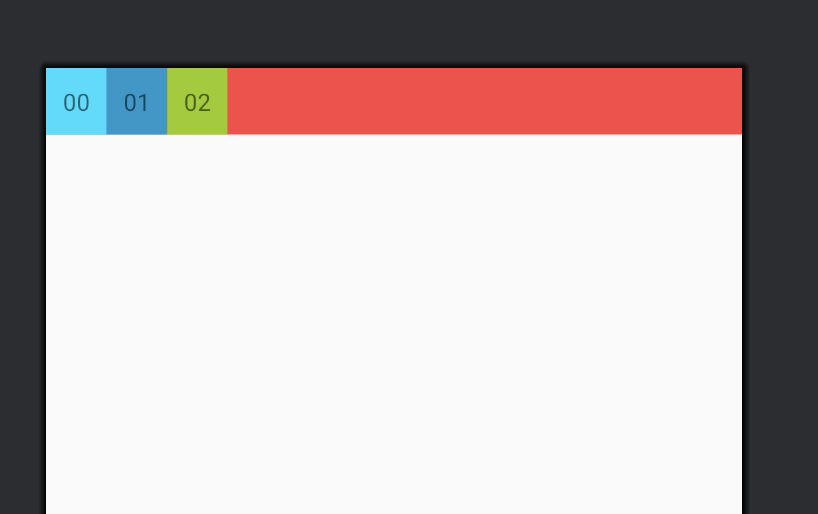
GridLayout内のTextViewが全て左寄せに表示されました。子Viewに大きさを指定していないので、当たり前といったら当たり前ですね。
LinearLayoutのlayout_weightのように、要素を均等に広げるためには、layout_columnWeight/layout_rowWeightを使います。今回は横幅を均等に広げるため、layout_columnWeightを使います。
<?xml version="1.0" encoding="utf-8"?>
<GridLayout xmlns:android="http://schemas.android.com/apk/res/android"
    android:layout_width="match_parent"
    android:layout_height="wrap_content"
    android:background="@android:color/holo_red_light"
    android:columnCount="3"
    android:rowCount="1">

    <TextView
        android:layout_row="0"
        android:layout_column="0"
        android:layout_columnWeight="1"
        android:background="@android:color/holo_blue_bright"
        android:padding="10dp"
        android:text="00" />

    <TextView
        android:layout_row="0"
        android:layout_column="1"
        android:layout_columnWeight="1"
        android:background="@android:color/holo_blue_dark"
        android:padding="10dp"
        android:text="01" />

    <TextView
        android:layout_row="0"
        android:layout_column="2"
        android:layout_columnWeight="1"
        android:background="@android:color/holo_green_light"
        android:padding="10dp"
        android:text="02" />
</GridLayout>
これでレイアウトを表示すると以下になります。

均等幅に表示されました。
layout_rowWeightも同様です。上のケースは、GridLayoutの高さ(layout_height)がwrap_content指定になっているため、100dp指定に変更して試してみます。
まずは、何も指定せずに表示を確認します。
<?xml version="1.0" encoding="utf-8"?>
<GridLayout xmlns:android="http://schemas.android.com/apk/res/android"
    android:layout_width="wrap_content"
    android:layout_height="100dp"
    android:background="@android:color/holo_red_light"
    android:columnCount="1"
    android:rowCount="2">

    <TextView
        android:layout_row="0"
        android:layout_column="0"
        android:background="@android:color/holo_blue_bright"
        android:padding="10dp"
        android:text="00" />

    <TextView
        android:layout_row="1"
        android:layout_column="0"
        android:background="@android:color/holo_green_light"
        android:padding="10dp"
        android:text="10" />

</GridLayout>
これでレイアウトを確認すると以下になります。

layout_columnWeightの時と同様、上寄せに要素が表示されました。layout_rowWeightを指定してみましょう。
<?xml version="1.0" encoding="utf-8"?>
<GridLayout xmlns:android="http://schemas.android.com/apk/res/android"
    android:layout_width="wrap_content"
    android:layout_height="100dp"
    android:background="@android:color/holo_red_light"
    android:columnCount="1"
    android:rowCount="2">

    <TextView
        android:layout_row="0"
        android:layout_rowWeight="1"
        android:layout_column="0"
        android:background="@android:color/holo_blue_bright"
        android:padding="10dp"
        android:text="00" />

    <TextView
        android:layout_row="1"
        android:layout_rowWeight="1"
        android:layout_column="0"
        android:background="@android:color/holo_green_light"
        android:padding="10dp"
        android:text="10" />

</GridLayout>
これでレイアウトの表示確認をすると以下になります。

子Viewが均等な高さで表示されました。
まとめ
今回はGridLayoutの使い方について解説しました。LinearLayoutやConstraintLayoutで大抵のことは実現できてしまうところではありますが、実はGridLayoutもうまく使えば同じように便利に利用することができます。実はGridLayoutだと、LinearLayoutでよく困るアレを解決することができるのですが...これは別の記事で紹介したいと思います。